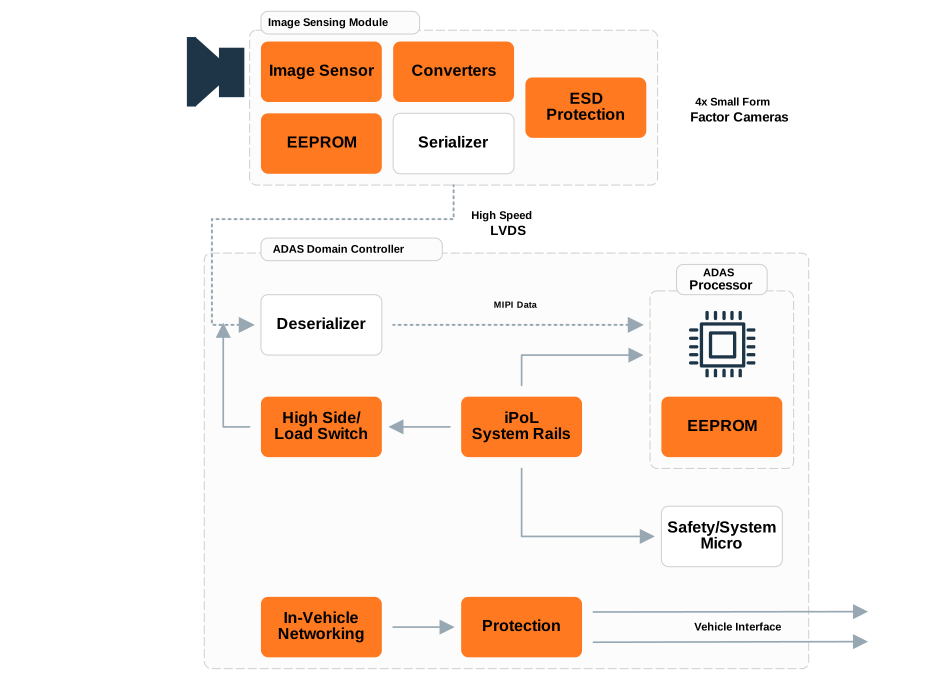
Interactive Block Diagrams

[{"id":"be30ddc1-91c2-4780-b01b-219003fcff96_IBD_SOLUTION","parentId":"916f3da5-3f52-4350-850d-bc9e19a1f792","text":"Automotive","path":"/design/interactive-block-diagrams/automotive","children":[{"id":"5c11e195-63c8-46c7-86f8-1bba41439f84_IBD_SUBSOLUTION","parentId":"be30ddc1-91c2-4780-b01b-219003fcff96_IBD_SOLUTION","text":"ADAS","path":null,"children":[{"id":"9f0d3c48-f0d7-59bb-bfe1-6d6c9a2ba6ad_IBD_DIAGRAM","parentId":"5c11e195-63c8-46c7-86f8-1bba41439f84_IBD_SUBSOLUTION","text":"ADAS Compute Unit","path":"/design/interactive-block-diagrams/automotive/adas-compute-unit","children":[]},{"id":"148814f6-10ba-54a2-a4e3-e907b8e9b82b_IBD_DIAGRAM","parentId":"5c11e195-63c8-46c7-86f8-1bba41439f84_IBD_SUBSOLUTION","text":"Automotive LiDAR","path":"/design/interactive-block-diagrams/automotive/automotive-lidar","children":[]},{"id":"f65e29e1-c5d2-5856-b0b4-91578b1c37d4_IBD_DIAGRAM","parentId":"5c11e195-63c8-46c7-86f8-1bba41439f84_IBD_SUBSOLUTION","text":"Automotive Radar","path":"/design/interactive-block-diagrams/automotive/automotive-radar","children":[]},{"id":"50c0b1ef-cc3f-5e3f-beab-3dc7fc4807df_IBD_DIAGRAM","parentId":"5c11e195-63c8-46c7-86f8-1bba41439f84_IBD_SUBSOLUTION","text":"Automotive Ultrasonic","path":"/design/interactive-block-diagrams/automotive/automotive-ultrasonic","children":[]},{"id":"b5fb612f-c3e5-5d35-ab27-eb8f322f3728_IBD_DIAGRAM","parentId":"5c11e195-63c8-46c7-86f8-1bba41439f84_IBD_SUBSOLUTION","text":"Side & Surround Sensing","path":"/design/interactive-block-diagrams/automotive/side-surround-sensing","children":[]},{"id":"dc1f8506-8b86-5500-9faa-37f24480dc40_IBD_DIAGRAM","parentId":"5c11e195-63c8-46c7-86f8-1bba41439f84_IBD_SUBSOLUTION","text":"Front Camera","path":"/design/interactive-block-diagrams/automotive/front-camera","children":[]},{"id":"ba6575f4-383a-4f1c-980a-34bd5bfcfef0_IBD_DIAGRAM","parentId":"5c11e195-63c8-46c7-86f8-1bba41439f84_IBD_SUBSOLUTION","text":"Dash Camera","path":"/design/interactive-block-diagrams/automotive/dash-camera","children":[]},{"id":"cfe0ced6-f8c9-58e7-b578-b76be36f21b0_IBD_DIAGRAM","parentId":"5c11e195-63c8-46c7-86f8-1bba41439f84_IBD_SUBSOLUTION","text":"In-Cabin Camera","path":"/design/interactive-block-diagrams/automotive/in-cabin-camera","children":[]}]},{"id":"6dc38289-2d12-4867-8e22-c819d48eff30_IBD_SUBSOLUTION","parentId":"be30ddc1-91c2-4780-b01b-219003fcff96_IBD_SOLUTION","text":"Electric and Hybrid Powertrain","path":null,"children":[{"id":"42b6f1ad-2a42-457e-ac12-f110641e7760_IBD_DIAGRAM","parentId":"6dc38289-2d12-4867-8e22-c819d48eff30_IBD_SUBSOLUTION","text":"Traction Inverter","path":"/design/interactive-block-diagrams/automotive/traction-inverter","children":[]},{"id":"990a11b6-ddff-4e22-b709-91e59667acdc_IBD_DIAGRAM","parentId":"6dc38289-2d12-4867-8e22-c819d48eff30_IBD_SUBSOLUTION","text":"OBC with DC/DC Converter","path":"/design/interactive-block-diagrams/automotive/obc-with-dc-dc-converter","children":[]},{"id":"0267ffaa-9395-4bf0-b9ea-9ede6bd5a7f1_IBD_DIAGRAM","parentId":"6dc38289-2d12-4867-8e22-c819d48eff30_IBD_SUBSOLUTION","text":"Battery Management System","path":"/design/interactive-block-diagrams/automotive/battery-management-system","children":[]},{"id":"27b6b5c7-6ad2-4e12-81e1-edf0fc9abacc_IBD_DIAGRAM","parentId":"6dc38289-2d12-4867-8e22-c819d48eff30_IBD_SUBSOLUTION","text":"EV Power Domain Controller","path":"/design/interactive-block-diagrams/automotive/ev-power-domain-controller","children":[]},{"id":"39b2372d-d4e5-50bd-b00c-5c1ef159007f_IBD_DIAGRAM","parentId":"6dc38289-2d12-4867-8e22-c819d48eff30_IBD_SUBSOLUTION","text":"On Board Charger","path":"/design/interactive-block-diagrams/automotive/on-board-charger","children":[{"id":"97404930-4801-5dbd-9499-e740cb99cbb9_IBD_SUBDIAGRAM","parentId":"39b2372d-d4e5-50bd-b00c-5c1ef159007f_IBD_DIAGRAM","text":"On Board Charger (400V)","path":"/design/interactive-block-diagrams/automotive/on-board-charger/on-board-charger-400v","children":[]},{"id":"39250da9-f231-50df-8342-6a53a14e9eb6_IBD_SUBDIAGRAM","parentId":"39b2372d-d4e5-50bd-b00c-5c1ef159007f_IBD_DIAGRAM","text":"On Board Charger (800V)","path":"/design/interactive-block-diagrams/automotive/on-board-charger/on-board-charger-800v","children":[]}]},{"id":"9dba7b29-f60b-571a-ae90-6a7e035e6991_IBD_DIAGRAM","parentId":"6dc38289-2d12-4867-8e22-c819d48eff30_IBD_SUBSOLUTION","text":"DC-DC Converter 48V-12V","path":"/design/interactive-block-diagrams/automotive/dc-dc-converter-48v-12v","children":[]},{"id":"a1234a32-95cf-4184-9067-2e0eedad6d11_IBD_DIAGRAM","parentId":"6dc38289-2d12-4867-8e22-c819d48eff30_IBD_SUBSOLUTION","text":"DC-DC Converter HV-48V/12V","path":"/design/interactive-block-diagrams/automotive/dc-dc-converter-hv-48v-12v","children":[]}]},{"id":"28e1ba87-464f-4582-a443-919f257171af_IBD_SUBSOLUTION","parentId":"be30ddc1-91c2-4780-b01b-219003fcff96_IBD_SOLUTION","text":"LED Lighting","path":null,"children":[{"id":"39712314-ea95-5c10-b8db-a580a9c54ac5_IBD_DIAGRAM","parentId":"28e1ba87-464f-4582-a443-919f257171af_IBD_SUBSOLUTION","text":"Front LED Lighting","path":"/design/interactive-block-diagrams/automotive/front-led-lighting","children":[]},{"id":"87fb6242-f2ba-53ed-9125-ec615df33b17_IBD_DIAGRAM","parentId":"28e1ba87-464f-4582-a443-919f257171af_IBD_SUBSOLUTION","text":"Rear LED Lighting","path":"/design/interactive-block-diagrams/automotive/rear-led-lighting","children":[]},{"id":"a60354d2-3f75-4e63-b7c5-9924391bfdb7_IBD_DIAGRAM","parentId":"28e1ba87-464f-4582-a443-919f257171af_IBD_SUBSOLUTION","text":"Interior Lighting","path":"/design/interactive-block-diagrams/automotive/interior-lighting","children":[]}]},{"id":"132edb10-6856-492a-8eed-3592df3609a5_IBD_SUBSOLUTION","parentId":"be30ddc1-91c2-4780-b01b-219003fcff96_IBD_SOLUTION","text":"Zonal Architecture","path":null,"children":[{"id":"656777ba-47a0-5746-9382-057914f8d978_IBD_DIAGRAM","parentId":"132edb10-6856-492a-8eed-3592df3609a5_IBD_SUBSOLUTION","text":"Zonal Controller","path":"/design/interactive-block-diagrams/automotive/zonal-controller","children":[]},{"id":"24236428-e5bc-5acc-8156-dbe95141d9b8_IBD_DIAGRAM","parentId":"132edb10-6856-492a-8eed-3592df3609a5_IBD_SUBSOLUTION","text":"Power Distribution Unit 48V","path":"/design/interactive-block-diagrams/automotive/power-distribution-unit-48v","children":[]},{"id":"9b134c51-95ab-582c-b129-0b115285f113_IBD_DIAGRAM","parentId":"132edb10-6856-492a-8eed-3592df3609a5_IBD_SUBSOLUTION","text":"Power Distribution Unit 12V","path":"/design/interactive-block-diagrams/automotive/power-distribution-unit-12v","children":[]}]},{"id":"d7b42b8a-70e0-43e9-bf99-8c3a50b19433_IBD_SUBSOLUTION","parentId":"be30ddc1-91c2-4780-b01b-219003fcff96_IBD_SOLUTION","text":"Body Electronics","path":null,"children":[{"id":"275ca701-7e5b-544a-a879-586ea961e734_IBD_DIAGRAM","parentId":"d7b42b8a-70e0-43e9-bf99-8c3a50b19433_IBD_SUBSOLUTION","text":"Body Control Module","path":"/design/interactive-block-diagrams/automotive/body-control-module","children":[]},{"id":"bf225aa6-f1a8-466d-84de-441d616f55ab_IBD_DIAGRAM","parentId":"d7b42b8a-70e0-43e9-bf99-8c3a50b19433_IBD_SUBSOLUTION","text":"CAN Network Splitter","path":"/design/interactive-block-diagrams/automotive/can-network-splitter","children":[]},{"id":"bd03c3b7-0aaa-5fdd-85b0-a6f264a0c416_IBD_DIAGRAM","parentId":"d7b42b8a-70e0-43e9-bf99-8c3a50b19433_IBD_SUBSOLUTION","text":"Door Control Module","path":"/design/interactive-block-diagrams/automotive/door-control-module","children":[]},{"id":"652215d6-6f4c-589d-86eb-5c37f3c729d7_IBD_DIAGRAM","parentId":"d7b42b8a-70e0-43e9-bf99-8c3a50b19433_IBD_SUBSOLUTION","text":"Rain and Light Sensor","path":"/design/interactive-block-diagrams/automotive/rain-and-light-sensor","children":[]},{"id":"961a6461-4d2e-4fc1-90ff-284a233863e3_IBD_DIAGRAM","parentId":"d7b42b8a-70e0-43e9-bf99-8c3a50b19433_IBD_SUBSOLUTION","text":"Remote Keyless System","path":"/design/interactive-block-diagrams/automotive/remote-keyless-system","children":[]},{"id":"96ceec95-3d45-4ccf-a05b-c9c496928cbd_IBD_DIAGRAM","parentId":"d7b42b8a-70e0-43e9-bf99-8c3a50b19433_IBD_SUBSOLUTION","text":"In-Vehicle Networking","path":"/design/interactive-block-diagrams/automotive/in-vehicle-networking","children":[]}]},{"id":"570e6761-14db-4caa-acfe-5d97a9fd9572_IBD_SUBSOLUTION","parentId":"be30ddc1-91c2-4780-b01b-219003fcff96_IBD_SOLUTION","text":"Chassis and Safety","path":null,"children":[{"id":"21980558-fc7d-5126-ba06-ad7a03b04dff_IBD_DIAGRAM","parentId":"570e6761-14db-4caa-acfe-5d97a9fd9572_IBD_SUBSOLUTION","text":"Anti-Lock Braking System","path":"/design/interactive-block-diagrams/automotive/anti-lock-braking-system","children":[]},{"id":"3b1308be-e510-5306-ac46-dfd8f8cae961_IBD_DIAGRAM","parentId":"570e6761-14db-4caa-acfe-5d97a9fd9572_IBD_SUBSOLUTION","text":"Electric Parking Brake","path":"/design/interactive-block-diagrams/automotive/electric-parking-brake","children":[]},{"id":"372f1853-f4ea-5b63-8c8e-07668666e1ed_IBD_DIAGRAM","parentId":"570e6761-14db-4caa-acfe-5d97a9fd9572_IBD_SUBSOLUTION","text":"Electric Power Steering","path":"/design/interactive-block-diagrams/automotive/electric-power-steering","children":[]},{"id":"70a1399f-062f-5e1f-8415-dd28be19baed_IBD_DIAGRAM","parentId":"570e6761-14db-4caa-acfe-5d97a9fd9572_IBD_SUBSOLUTION","text":"Throttle Control","path":"/design/interactive-block-diagrams/automotive/throttle-control","children":[]},{"id":"161c0eec-08eb-4912-8072-0b9858287749_IBD_DIAGRAM","parentId":"570e6761-14db-4caa-acfe-5d97a9fd9572_IBD_SUBSOLUTION","text":"Steer-by-Wire","path":"/design/interactive-block-diagrams/automotive/steer-by-wire","children":[]},{"id":"34bf112e-1b74-520a-b255-f0a6233da422_IBD_DIAGRAM","parentId":"570e6761-14db-4caa-acfe-5d97a9fd9572_IBD_SUBSOLUTION","text":"Transmission Control Unit","path":"/design/interactive-block-diagrams/automotive/transmission-control-unit","children":[]},{"id":"9214a133-c83f-40d5-8fad-d645b4bb3f66_IBD_DIAGRAM","parentId":"570e6761-14db-4caa-acfe-5d97a9fd9572_IBD_SUBSOLUTION","text":"Tire Monitoring System","path":"/design/interactive-block-diagrams/automotive/tire-monitoring-system","children":[]},{"id":"1078006a-3b72-4b69-9af0-f215e0c80522_IBD_DIAGRAM","parentId":"570e6761-14db-4caa-acfe-5d97a9fd9572_IBD_SUBSOLUTION","text":"Active Suspension","path":"/design/interactive-block-diagrams/automotive/active-suspension","children":[]},{"id":"b94ec2f0-8023-4230-bb06-ecb8b75a0808_IBD_DIAGRAM","parentId":"570e6761-14db-4caa-acfe-5d97a9fd9572_IBD_SUBSOLUTION","text":"Electronic Stabilization Control (ESC)","path":"/design/interactive-block-diagrams/automotive/electronic-stabilization-control-esc","children":[]},{"id":"cf95ee59-77c3-4f76-b7e2-479737822229_IBD_DIAGRAM","parentId":"570e6761-14db-4caa-acfe-5d97a9fd9572_IBD_SUBSOLUTION","text":"EV Auxiliary Systems","path":"/design/interactive-block-diagrams/automotive/ev-auxiliary-systems","children":[]}]},{"id":"fb7c2e6a-4a5a-430f-9c05-f205d9803241_IBD_SUBSOLUTION","parentId":"be30ddc1-91c2-4780-b01b-219003fcff96_IBD_SOLUTION","text":"ICE Powertrain","path":null,"children":[{"id":"0dc8f98c-2cdc-5a61-87c9-00ce7dd8f4c4_IBD_DIAGRAM","parentId":"fb7c2e6a-4a5a-430f-9c05-f205d9803241_IBD_SUBSOLUTION","text":"ICE 48V e-Turbocharger","path":"/design/interactive-block-diagrams/automotive/ice-48v-e-turbocharger","children":[]},{"id":"2a471a6f-313b-5468-87f5-7b85c588acb2_IBD_DIAGRAM","parentId":"fb7c2e6a-4a5a-430f-9c05-f205d9803241_IBD_SUBSOLUTION","text":"ICE Engine Control Unit","path":"/design/interactive-block-diagrams/automotive/ice-engine-control-unit","children":[]},{"id":"4bd681d4-0a10-568c-a9ec-3e7a2cf374fe_IBD_DIAGRAM","parentId":"fb7c2e6a-4a5a-430f-9c05-f205d9803241_IBD_SUBSOLUTION","text":"MHEV Starter Generator","path":"/design/interactive-block-diagrams/automotive/mhev-starter-generator","children":[]}]},{"id":"4144801e-6a4c-44c8-8049-28af95d8735e_IBD_SUBSOLUTION","parentId":"be30ddc1-91c2-4780-b01b-219003fcff96_IBD_SOLUTION","text":"Infotainment","path":null,"children":[{"id":"3cafe8fb-1c54-4006-a888-3293e38bc1e3_IBD_DIAGRAM","parentId":"4144801e-6a4c-44c8-8049-28af95d8735e_IBD_SUBSOLUTION","text":"Instrument Cluster","path":"/design/interactive-block-diagrams/automotive/instrument-cluster","children":[]}]},{"id":"4031b97b-d817-457a-aaf0-033716c8261d_IBD_SUBSOLUTION","parentId":"be30ddc1-91c2-4780-b01b-219003fcff96_IBD_SOLUTION","text":"Thermal Management","path":null,"children":[{"id":"89a0959f-82ef-4537-89cf-113ce733605f_IBD_DIAGRAM","parentId":"4031b97b-d817-457a-aaf0-033716c8261d_IBD_SUBSOLUTION","text":"EV Thermal Management System","path":"/design/interactive-block-diagrams/automotive/ev-thermal-management-system","children":[]},{"id":"d77ff017-846b-4eeb-a9ee-b74f292e33d4_IBD_DIAGRAM","parentId":"4031b97b-d817-457a-aaf0-033716c8261d_IBD_SUBSOLUTION","text":"Automotive Pump and Fan","path":"/design/interactive-block-diagrams/automotive/automotive-pump-and-fan","children":[]},{"id":"04e60cb5-a684-5426-aae1-2c46a58dc15b_IBD_DIAGRAM","parentId":"4031b97b-d817-457a-aaf0-033716c8261d_IBD_SUBSOLUTION","text":"HVAC PTC Heater","path":"/design/interactive-block-diagrams/automotive/hvac-ptc-heater","children":[]},{"id":"cee5f20a-1756-564d-ae31-ca13e1a11cfb_IBD_DIAGRAM","parentId":"4031b97b-d817-457a-aaf0-033716c8261d_IBD_SUBSOLUTION","text":"HVAC E-Compressor","path":"/design/interactive-block-diagrams/automotive/hvac-e-compressor","children":[]}]}]},{"id":"595a65c3-53bc-4d2b-998d-f29b04cb96c1_IBD_SOLUTION","parentId":"916f3da5-3f52-4350-850d-bc9e19a1f792","text":"Industrial","path":"/design/interactive-block-diagrams/industrial","children":[{"id":"232c98aa-1c87-4d4c-86a8-a012a8d4c01e_IBD_SUBSOLUTION","parentId":"595a65c3-53bc-4d2b-998d-f29b04cb96c1_IBD_SOLUTION","text":"Industrial Automation","path":null,"children":[{"id":"e1af3336-9c4d-414b-8654-5e654677de14_IBD_DIAGRAM","parentId":"232c98aa-1c87-4d4c-86a8-a012a8d4c01e_IBD_SUBSOLUTION","text":"General Control System","path":"/design/interactive-block-diagrams/industrial/general-control-system","children":[]},{"id":"1ede4b8e-ec50-473e-9c7c-fbe9fa75eef8_IBD_DIAGRAM","parentId":"232c98aa-1c87-4d4c-86a8-a012a8d4c01e_IBD_SUBSOLUTION","text":"Industrial PC, PLC and IO","path":"/design/interactive-block-diagrams/industrial/industrial-pc-plc-and-io","children":[]},{"id":"044b62b2-c00e-4513-81eb-36f766359581_IBD_DIAGRAM","parentId":"232c98aa-1c87-4d4c-86a8-a012a8d4c01e_IBD_SUBSOLUTION","text":"ATE & Lab Equipment","path":"/design/interactive-block-diagrams/industrial/ate-lab-equipment","children":[]},{"id":"6e861fa3-61ed-471a-af44-1ab13f997998_IBD_DIAGRAM","parentId":"232c98aa-1c87-4d4c-86a8-a012a8d4c01e_IBD_SUBSOLUTION","text":"Drone","path":"/design/interactive-block-diagrams/industrial/drone","children":[]},{"id":"106fa19a-4128-4f5c-a1d6-d474b81a3c62_IBD_DIAGRAM","parentId":"232c98aa-1c87-4d4c-86a8-a012a8d4c01e_IBD_SUBSOLUTION","text":"Industrial Automation Vehicle","path":"/design/interactive-block-diagrams/industrial/industrial-automation-vehicle","children":[]},{"id":"0a4f06f5-5e8c-483e-b270-da09c4492a35_IBD_DIAGRAM","parentId":"232c98aa-1c87-4d4c-86a8-a012a8d4c01e_IBD_SUBSOLUTION","text":"Cobot","path":"/design/interactive-block-diagrams/industrial/cobot","children":[]},{"id":"97fbfb24-52ce-41cd-ac06-9bbea124da75_IBD_DIAGRAM","parentId":"232c98aa-1c87-4d4c-86a8-a012a8d4c01e_IBD_SUBSOLUTION","text":"Factory Network","path":"/design/interactive-block-diagrams/industrial/factory-network","children":[]},{"id":"f2a03783-f346-4593-99f4-0aef0ea5b88b_IBD_DIAGRAM","parentId":"232c98aa-1c87-4d4c-86a8-a012a8d4c01e_IBD_SUBSOLUTION","text":"Industrial Welding","path":"/design/interactive-block-diagrams/industrial/industrial-welding","children":[]},{"id":"de90504c-e5a4-4223-95f6-9af36a9989d4_IBD_DIAGRAM","parentId":"232c98aa-1c87-4d4c-86a8-a012a8d4c01e_IBD_SUBSOLUTION","text":"Humanoid Robot ","path":"/design/interactive-block-diagrams/industrial/humanoid-robot","children":[{"id":"fc5a726b-0cda-4b9b-85e3-3f755206c2e5_IBD_SUBDIAGRAM","parentId":"de90504c-e5a4-4223-95f6-9af36a9989d4_IBD_DIAGRAM","text":"Humanoid Robot Head","path":"/design/interactive-block-diagrams/industrial/humanoid-robot/humanoid-robot-head","children":[]},{"id":"a08574e4-c789-4a07-bd2d-72455d7064c2_IBD_SUBDIAGRAM","parentId":"de90504c-e5a4-4223-95f6-9af36a9989d4_IBD_DIAGRAM","text":"Humanoid Robot Body","path":"/design/interactive-block-diagrams/industrial/humanoid-robot/humanoid-robot-body","children":[]},{"id":"a9deeed5-586d-413e-b28b-134dbf6aeeed_IBD_SUBDIAGRAM","parentId":"de90504c-e5a4-4223-95f6-9af36a9989d4_IBD_DIAGRAM","text":"Humanoid Robot Arms and Legs","path":"/design/interactive-block-diagrams/industrial/humanoid-robot/humanoid-robot-arms-and-legs","children":[]},{"id":"722b254e-b3c3-4194-a2ac-ea1de5e68e75_IBD_SUBDIAGRAM","parentId":"de90504c-e5a4-4223-95f6-9af36a9989d4_IBD_DIAGRAM","text":"Humanoid Robot Hand","path":"/design/interactive-block-diagrams/industrial/humanoid-robot/humanoid-robot-hand","children":[]}]},{"id":"30c1b77d-67e5-5106-a3c4-8c8d81f3d496_IBD_DIAGRAM","parentId":"232c98aa-1c87-4d4c-86a8-a012a8d4c01e_IBD_SUBSOLUTION","text":"Machine Vision","path":"/design/interactive-block-diagrams/industrial/machine-vision","children":[]},{"id":"7b2690f5-c548-508a-a47c-fec22e9853b8_IBD_DIAGRAM","parentId":"232c98aa-1c87-4d4c-86a8-a012a8d4c01e_IBD_SUBSOLUTION","text":"Smart and Mobile Robotics","path":"/design/interactive-block-diagrams/industrial/smart-and-mobile-robotics","children":[]},{"id":"e3467e69-26ef-5fa7-bdc5-a1cc62b3de50_IBD_DIAGRAM","parentId":"232c98aa-1c87-4d4c-86a8-a012a8d4c01e_IBD_SUBSOLUTION","text":"Single Phase Motor Drive","path":"/design/interactive-block-diagrams/industrial/single-phase-motor-drive","children":[]},{"id":"de5a1036-a499-4a5d-bead-da0cabb0b935_IBD_DIAGRAM","parentId":"232c98aa-1c87-4d4c-86a8-a012a8d4c01e_IBD_SUBSOLUTION","text":"Three Phase Motor Drive","path":"/design/interactive-block-diagrams/industrial/three-phase-motor-drive","children":[]}]},{"id":"5d797047-8646-41ee-90f4-1d36c3128dcd_IBD_SUBSOLUTION","parentId":"595a65c3-53bc-4d2b-998d-f29b04cb96c1_IBD_SOLUTION","text":"Energy Infrastructure","path":null,"children":[{"id":"5e156763-10fa-4245-97e8-5eb443f8725a_IBD_DIAGRAM","parentId":"5d797047-8646-41ee-90f4-1d36c3128dcd_IBD_SUBSOLUTION","text":"AC Wallbox","path":"/design/interactive-block-diagrams/industrial/ac-wallbox","children":[]},{"id":"51ceb23d-0b92-476e-bc92-ad48cc02c16c_IBD_DIAGRAM","parentId":"5d797047-8646-41ee-90f4-1d36c3128dcd_IBD_SUBSOLUTION","text":"EV Wireless Charger","path":"/design/interactive-block-diagrams/industrial/ev-wireless-charger","children":[]},{"id":"dcf61746-d942-443a-b3bd-95af261dc6fb_IBD_DIAGRAM","parentId":"5d797047-8646-41ee-90f4-1d36c3128dcd_IBD_SUBSOLUTION","text":"Hydrogen Electrolyzer","path":"/design/interactive-block-diagrams/industrial/hydrogen-electrolyzer","children":[]},{"id":"46c10fa2-4630-402d-aaf9-fbe2e859d48b_IBD_DIAGRAM","parentId":"5d797047-8646-41ee-90f4-1d36c3128dcd_IBD_SUBSOLUTION","text":"Battery Formation","path":"/design/interactive-block-diagrams/industrial/battery-formation","children":[]},{"id":"b2d84afb-c481-44a8-bcb8-0da715eca994_IBD_DIAGRAM","parentId":"5d797047-8646-41ee-90f4-1d36c3128dcd_IBD_SUBSOLUTION","text":"Solid-State Transformer","path":"/design/interactive-block-diagrams/industrial/solid-state-transformer","children":[]},{"id":"513da59c-64c8-425a-aac4-2f77be98ba43_IBD_DIAGRAM","parentId":"5d797047-8646-41ee-90f4-1d36c3128dcd_IBD_SUBSOLUTION","text":"DC EV Charger","path":"/design/interactive-block-diagrams/industrial/dc-ev-charger","children":[]},{"id":"72932e92-2ecd-5cba-8f77-cda6834f2e87_IBD_DIAGRAM","parentId":"5d797047-8646-41ee-90f4-1d36c3128dcd_IBD_SUBSOLUTION","text":"Energy Storage System","path":"/design/interactive-block-diagrams/industrial/energy-storage-system","children":[{"id":"3100cf90-30b4-47f1-9989-0703b658513d_IBD_SUBDIAGRAM","parentId":"72932e92-2ecd-5cba-8f77-cda6834f2e87_IBD_DIAGRAM","text":"Energy Storage System DC","path":"/design/interactive-block-diagrams/industrial/energy-storage-system/energy-storage-system-dc","children":[]},{"id":"b958931f-7966-4d79-8bb6-5cae9dc53094_IBD_SUBDIAGRAM","parentId":"72932e92-2ecd-5cba-8f77-cda6834f2e87_IBD_DIAGRAM","text":"Energy Storage System AC","path":"/design/interactive-block-diagrams/industrial/energy-storage-system/energy-storage-system-ac","children":[]}]},{"id":"b502a183-a9af-5173-95dd-04d05136a919_IBD_DIAGRAM","parentId":"5d797047-8646-41ee-90f4-1d36c3128dcd_IBD_SUBSOLUTION","text":"Solar Inverter","path":"/design/interactive-block-diagrams/industrial/solar-inverter","children":[]},{"id":"9d5dee70-15ac-4afb-b7de-9f5963b93a41_IBD_DIAGRAM","parentId":"5d797047-8646-41ee-90f4-1d36c3128dcd_IBD_SUBSOLUTION","text":"Solar DC Optimizer","path":"/design/interactive-block-diagrams/industrial/solar-dc-optimizer","children":[]},{"id":"b2a40e03-2356-4646-99d8-26c6182112c1_IBD_DIAGRAM","parentId":"5d797047-8646-41ee-90f4-1d36c3128dcd_IBD_SUBSOLUTION","text":"Solar Microinverter","path":"/design/interactive-block-diagrams/industrial/solar-microinverter","children":[]},{"id":"76507261-6d8d-58b4-8c08-fe868f42cd2c_IBD_DIAGRAM","parentId":"5d797047-8646-41ee-90f4-1d36c3128dcd_IBD_SUBSOLUTION","text":"Uninterruptible Power Supply","path":"/design/interactive-block-diagrams/industrial/uninterruptible-power-supply","children":[{"id":"2ec65cfa-dba4-5099-9bc3-c7aebcd710e2_IBD_SUBDIAGRAM","parentId":"76507261-6d8d-58b4-8c08-fe868f42cd2c_IBD_DIAGRAM","text":"Line-interactive UPS","path":"/design/interactive-block-diagrams/industrial/uninterruptible-power-supply/line-interactive-ups","children":[]},{"id":"1caf06ea-7e8c-5826-8cc2-6e95246788e9_IBD_SUBDIAGRAM","parentId":"76507261-6d8d-58b4-8c08-fe868f42cd2c_IBD_DIAGRAM","text":"Offline UPS","path":"/design/interactive-block-diagrams/industrial/uninterruptible-power-supply/offline-ups","children":[]},{"id":"7088c373-b0ba-5d51-a2c7-71202c80eff9_IBD_SUBDIAGRAM","parentId":"76507261-6d8d-58b4-8c08-fe868f42cd2c_IBD_DIAGRAM","text":"Online UPS","path":"/design/interactive-block-diagrams/industrial/uninterruptible-power-supply/online-ups","children":[]}]},{"id":"ccabe4a7-e2ec-5740-a897-45a035b57f16_IBD_DIAGRAM","parentId":"5d797047-8646-41ee-90f4-1d36c3128dcd_IBD_SUBSOLUTION","text":"DC-DC Power Supply","path":"/design/interactive-block-diagrams/industrial/dc-dc-power-supply","children":[]},{"id":"3aa8f5a1-7ee9-448e-9feb-82829e256fdb_IBD_DIAGRAM","parentId":"5d797047-8646-41ee-90f4-1d36c3128dcd_IBD_SUBSOLUTION","text":"Switched-Mode Power Supply","path":"/design/interactive-block-diagrams/industrial/switched-mode-power-supply","children":[{"id":"df44843c-72d3-5cfa-980d-4fcab45e2823_IBD_SUBDIAGRAM","parentId":"3aa8f5a1-7ee9-448e-9feb-82829e256fdb_IBD_DIAGRAM","text":"SMPS (>200W)","path":"/design/interactive-block-diagrams/industrial/switched-mode-power-supply/smps-200w","children":[]},{"id":"c9b6da80-3d61-52a7-b3db-a9147d3fc473_IBD_SUBDIAGRAM","parentId":"3aa8f5a1-7ee9-448e-9feb-82829e256fdb_IBD_DIAGRAM","text":"SMPS (65 - 200W)","path":"/design/interactive-block-diagrams/industrial/switched-mode-power-supply/smps-65-200w","children":[]},{"id":"71da596d-1c0b-4635-ae90-00d1508dbf82_IBD_SUBDIAGRAM","parentId":"3aa8f5a1-7ee9-448e-9feb-82829e256fdb_IBD_DIAGRAM","text":"SMPS (5 - 65W)","path":"/design/interactive-block-diagrams/industrial/switched-mode-power-supply/smps-5-65w","children":[]}]},{"id":"353bc0a2-1da8-57d6-a759-65cabba958eb_IBD_DIAGRAM","parentId":"5d797047-8646-41ee-90f4-1d36c3128dcd_IBD_SUBSOLUTION","text":"Li-ion Battery Charger","path":"/design/interactive-block-diagrams/industrial/li-ion-battery-charger","children":[]},{"id":"f7954e86-51aa-4955-af63-275c75aa281d_IBD_DIAGRAM","parentId":"5d797047-8646-41ee-90f4-1d36c3128dcd_IBD_SUBSOLUTION","text":"Solid-State Circuit Breaker","path":"/design/interactive-block-diagrams/industrial/solid-state-circuit-breaker","children":[]}]},{"id":"ac4808e3-627d-44b5-a3df-87fc3f47610f_IBD_SUBSOLUTION","parentId":"595a65c3-53bc-4d2b-998d-f29b04cb96c1_IBD_SOLUTION","text":"Smart Building & City","path":null,"children":[{"id":"3d7ee95e-0859-41d2-b6bc-78cc88004617_IBD_DIAGRAM","parentId":"ac4808e3-627d-44b5-a3df-87fc3f47610f_IBD_SUBSOLUTION","text":"Asset Tracker","path":"/design/interactive-block-diagrams/industrial/asset-tracker","children":[]},{"id":"efc3e711-ead6-5d29-bc1e-7df5c81fa2b8_IBD_DIAGRAM","parentId":"ac4808e3-627d-44b5-a3df-87fc3f47610f_IBD_SUBSOLUTION","text":"Battery-powered Tools","path":"/design/interactive-block-diagrams/industrial/battery-powered-tools","children":[]},{"id":"51642a6b-6c26-4b46-93cc-d47cd6640e59_IBD_DIAGRAM","parentId":"ac4808e3-627d-44b5-a3df-87fc3f47610f_IBD_SUBSOLUTION","text":"Heavy Duty Power Tool","path":"/design/interactive-block-diagrams/industrial/heavy-duty-power-tool","children":[]},{"id":"29e3cc42-6b14-5af6-a63e-5d9a4ad3aadb_IBD_DIAGRAM","parentId":"ac4808e3-627d-44b5-a3df-87fc3f47610f_IBD_SUBSOLUTION","text":"LED Lighting","path":"/design/interactive-block-diagrams/industrial/led-lighting","children":[]},{"id":"245d3de5-5e15-4e2f-9786-88a62ec28712_IBD_DIAGRAM","parentId":"ac4808e3-627d-44b5-a3df-87fc3f47610f_IBD_SUBSOLUTION","text":"Heat Pump Outdoor Unit","path":"/design/interactive-block-diagrams/industrial/heat-pump-outdoor-unit","children":[]},{"id":"7f7061a2-8c3e-4d66-872f-e73b78589050_IBD_DIAGRAM","parentId":"ac4808e3-627d-44b5-a3df-87fc3f47610f_IBD_SUBSOLUTION","text":"Heat Pump Indoor Unit","path":"/design/interactive-block-diagrams/industrial/heat-pump-indoor-unit","children":[]},{"id":"f8c5aef9-4334-4d90-8ad9-f66dc4f643b2_IBD_DIAGRAM","parentId":"ac4808e3-627d-44b5-a3df-87fc3f47610f_IBD_SUBSOLUTION","text":"E-bike and E-scooter","path":"/design/interactive-block-diagrams/industrial/e-bike-and-e-scooter","children":[]},{"id":"b466d0b4-2879-4491-b439-0e1661c759d2_IBD_DIAGRAM","parentId":"ac4808e3-627d-44b5-a3df-87fc3f47610f_IBD_SUBSOLUTION","text":"Electric Commercial Vehicles","path":"/design/interactive-block-diagrams/industrial/electric-commercial-vehicles","children":[]},{"id":"e340cab7-2b71-4b62-9038-af30f9d33c9c_IBD_DIAGRAM","parentId":"ac4808e3-627d-44b5-a3df-87fc3f47610f_IBD_SUBSOLUTION","text":"Small Electric Vehicles","path":"/design/interactive-block-diagrams/industrial/small-electric-vehicles","children":[{"id":"b04e8321-b3b5-4e44-ba0b-c846f0820401_IBD_SUBDIAGRAM","parentId":"e340cab7-2b71-4b62-9038-af30f9d33c9c_IBD_DIAGRAM","text":"Main Motor Inverter","path":"/design/interactive-block-diagrams/industrial/small-electric-vehicles/main-motor-inverter","children":[]},{"id":"44c71670-c7ca-4fd3-944b-d8f5e7e3cdd4_IBD_SUBDIAGRAM","parentId":"e340cab7-2b71-4b62-9038-af30f9d33c9c_IBD_DIAGRAM","text":"External Charger","path":"/design/interactive-block-diagrams/industrial/small-electric-vehicles/external-charger","children":[]}]},{"id":"796b157f-7440-47a1-9d77-b6f6583b189f_IBD_DIAGRAM","parentId":"ac4808e3-627d-44b5-a3df-87fc3f47610f_IBD_SUBSOLUTION","text":"Smart Lock","path":"/design/interactive-block-diagrams/industrial/smart-lock","children":[]},{"id":"73d28e8a-20b1-454b-8ca2-99bb78e6046a_IBD_DIAGRAM","parentId":"ac4808e3-627d-44b5-a3df-87fc3f47610f_IBD_SUBSOLUTION","text":"Smart Meter","path":"/design/interactive-block-diagrams/industrial/smart-meter","children":[]},{"id":"b1ae8f65-4698-477e-8cc5-520737530d7e_IBD_DIAGRAM","parentId":"ac4808e3-627d-44b5-a3df-87fc3f47610f_IBD_SUBSOLUTION","text":"Barcode & Biometric Scanning ","path":"/design/interactive-block-diagrams/industrial/barcode-biometric-scanning","children":[]},{"id":"57ce95cb-37d7-463a-a26a-6f42b639d382_IBD_DIAGRAM","parentId":"ac4808e3-627d-44b5-a3df-87fc3f47610f_IBD_SUBSOLUTION","text":"Video Conferencing System","path":"/design/interactive-block-diagrams/industrial/video-conferencing-system","children":[]},{"id":"0a8559e5-6c09-494b-8c45-5378087af949_IBD_DIAGRAM","parentId":"ac4808e3-627d-44b5-a3df-87fc3f47610f_IBD_SUBSOLUTION","text":"eVTOL","path":"/design/interactive-block-diagrams/industrial/evtol","children":[]},{"id":"0dc3a29e-27b1-5eba-8ed0-08937dbc87b4_IBD_DIAGRAM","parentId":"ac4808e3-627d-44b5-a3df-87fc3f47610f_IBD_SUBSOLUTION","text":"Security and Surveillance","path":"/design/interactive-block-diagrams/industrial/security-and-surveillance","children":[]}]}]},{"id":"9cb15800-d401-4ee1-8be6-37ce6d162fa7_IBD_SOLUTION","parentId":"916f3da5-3f52-4350-850d-bc9e19a1f792","text":"Telecom","path":"/design/interactive-block-diagrams/telecom","children":[{"id":"2a7a547e-c475-46c3-838d-ad483baba521_IBD_SUBSOLUTION","parentId":"9cb15800-d401-4ee1-8be6-37ce6d162fa7_IBD_SOLUTION","text":"Base Stations","path":null,"children":[{"id":"42af7365-cc95-45f1-84b2-3b8356857860_IBD_DIAGRAM","parentId":"2a7a547e-c475-46c3-838d-ad483baba521_IBD_SUBSOLUTION","text":"Base Station Power Supply","path":"/design/interactive-block-diagrams/telecom/base-station-power-supply","children":[]},{"id":"0086e7a8-869a-4184-a099-f6a708b47d5e_IBD_DIAGRAM","parentId":"2a7a547e-c475-46c3-838d-ad483baba521_IBD_SUBSOLUTION","text":"Remote Radio Unit","path":"/design/interactive-block-diagrams/telecom/remote-radio-unit","children":[]},{"id":"5c6d4a4c-70e5-48c1-81ca-874760068fb8_IBD_DIAGRAM","parentId":"2a7a547e-c475-46c3-838d-ad483baba521_IBD_SUBSOLUTION","text":"Base Band Unit","path":"/design/interactive-block-diagrams/telecom/base-band-unit","children":[]}]}]},{"id":"1b69edd1-b3b1-49e4-beb3-52ac41d4d80c_IBD_SOLUTION","parentId":"916f3da5-3f52-4350-850d-bc9e19a1f792","text":"Computing","path":"/design/interactive-block-diagrams/computing","children":[{"id":"6c03ce86-648a-4ed1-bbfa-2be5dbef3f55_IBD_SUBSOLUTION","parentId":"1b69edd1-b3b1-49e4-beb3-52ac41d4d80c_IBD_SOLUTION","text":"Computer","path":null,"children":[{"id":"0a714a1e-de7e-4bee-83d5-c1f3c38e7832_IBD_DIAGRAM","parentId":"6c03ce86-648a-4ed1-bbfa-2be5dbef3f55_IBD_SUBSOLUTION","text":"Desktop","path":"/design/interactive-block-diagrams/computing/desktop","children":[]}]},{"id":"41faaa82-bd84-4e5a-9c20-d2a52febcf17_IBD_SUBSOLUTION","parentId":"1b69edd1-b3b1-49e4-beb3-52ac41d4d80c_IBD_SOLUTION","text":"Data Center","path":null,"children":[{"id":"07006184-e12f-4fc3-98c2-0a10b6bdb7dc_IBD_DIAGRAM","parentId":"41faaa82-bd84-4e5a-9c20-d2a52febcf17_IBD_SUBSOLUTION","text":"AI-accelerated Server","path":"/design/interactive-block-diagrams/computing/ai-accelerated-server","children":[]},{"id":"b3f265c2-5e05-4719-9ce0-d1071bc4c6eb_IBD_DIAGRAM","parentId":"41faaa82-bd84-4e5a-9c20-d2a52febcf17_IBD_SUBSOLUTION","text":"Server Rack","path":"/design/interactive-block-diagrams/computing/server-rack","children":[{"id":"3fafe0cb-64c8-4590-87b1-3639cc9f4d4e_IBD_SUBDIAGRAM","parentId":"b3f265c2-5e05-4719-9ce0-d1071bc4c6eb_IBD_DIAGRAM","text":"Server PSU","path":"/design/interactive-block-diagrams/computing/server-rack/server-psu","children":[]},{"id":"333ef614-7270-4bba-b9af-bedc3a8fc88b_IBD_SUBDIAGRAM","parentId":"b3f265c2-5e05-4719-9ce0-d1071bc4c6eb_IBD_DIAGRAM","text":"Server Motherboard","path":"/design/interactive-block-diagrams/computing/server-rack/server-motherboard","children":[]}]},{"id":"b0a881ac-aa5d-4ad0-b6d0-c7baa47b1967_IBD_DIAGRAM","parentId":"41faaa82-bd84-4e5a-9c20-d2a52febcf17_IBD_SUBSOLUTION","text":"AI Data Center","path":"/design/interactive-block-diagrams/computing/ai-data-center","children":[]},{"id":"9152713c-6fa2-47fb-a24c-52c66e2465b1_IBD_DIAGRAM","parentId":"41faaa82-bd84-4e5a-9c20-d2a52febcf17_IBD_SUBSOLUTION","text":"AI HVDC","path":"/design/interactive-block-diagrams/computing/ai-hvdc","children":[{"id":"b31fcf2b-4c5c-4e10-8c07-f4e0015afd66_IBD_SUBDIAGRAM","parentId":"9152713c-6fa2-47fb-a24c-52c66e2465b1_IBD_DIAGRAM","text":"Power Rack","path":"/design/interactive-block-diagrams/computing/ai-hvdc/power-rack","children":[]},{"id":"7dbbd5d4-3cf5-4196-995f-93120d10dac8_IBD_SUBDIAGRAM","parentId":"9152713c-6fa2-47fb-a24c-52c66e2465b1_IBD_DIAGRAM","text":"Compute Rack","path":"/design/interactive-block-diagrams/computing/ai-hvdc/compute-rack","children":[]}]}]}]},{"id":"873eba36-5810-4201-b40f-49e775f3b450_IBD_SOLUTION","parentId":"916f3da5-3f52-4350-850d-bc9e19a1f792","text":"Consumer","path":"/design/interactive-block-diagrams/consumer","children":[{"id":"bc61eca1-fb8f-4d8f-ba3a-0cd57cbf51aa_IBD_SUBSOLUTION","parentId":"873eba36-5810-4201-b40f-49e775f3b450_IBD_SOLUTION","text":"Appliance","path":null,"children":[{"id":"7d762e83-bd55-59ae-8cc2-2eb55c485306_IBD_DIAGRAM","parentId":"bc61eca1-fb8f-4d8f-ba3a-0cd57cbf51aa_IBD_SUBSOLUTION","text":"Consumer HVAC","path":"/design/interactive-block-diagrams/consumer/consumer-hvac","children":[]}]},{"id":"358c5e78-e160-4fe5-a873-dcf1ae26676c_IBD_SUBSOLUTION","parentId":"873eba36-5810-4201-b40f-49e775f3b450_IBD_SOLUTION","text":"Entertainment","path":null,"children":[{"id":"1476432b-40fc-4eea-9244-06ec9aac93a4_IBD_DIAGRAM","parentId":"358c5e78-e160-4fe5-a873-dcf1ae26676c_IBD_SUBSOLUTION","text":"AR and VR Controller","path":"/design/interactive-block-diagrams/consumer/ar-and-vr-controller","children":[]},{"id":"9be26012-fba4-48e2-af35-065fbec05f7d_IBD_DIAGRAM","parentId":"358c5e78-e160-4fe5-a873-dcf1ae26676c_IBD_SUBSOLUTION","text":"AR and VR Headset","path":"/design/interactive-block-diagrams/consumer/ar-and-vr-headset","children":[]},{"id":"a3f41c6f-ce8e-5ff1-a485-04f6b19b5197_IBD_DIAGRAM","parentId":"358c5e78-e160-4fe5-a873-dcf1ae26676c_IBD_SUBSOLUTION","text":"LCD TV Power Supply","path":"/design/interactive-block-diagrams/consumer/lcd-tv-power-supply","children":[]}]},{"id":"de1af950-645f-4049-a9a4-58825293803a_IBD_SUBSOLUTION","parentId":"873eba36-5810-4201-b40f-49e775f3b450_IBD_SOLUTION","text":"Portable","path":null,"children":[{"id":"46b86326-714d-4130-832c-29284bd5b5d3_IBD_DIAGRAM","parentId":"de1af950-645f-4049-a9a4-58825293803a_IBD_SUBSOLUTION","text":"Portable Camera","path":"/design/interactive-block-diagrams/consumer/portable-camera","children":[]}]},{"id":"3b75a898-5dee-4729-95d7-26e1aa15021e_IBD_SUBSOLUTION","parentId":"873eba36-5810-4201-b40f-49e775f3b450_IBD_SOLUTION","text":"USB & Wireless Chargers","path":null,"children":[{"id":"c96731ea-a25d-5f1d-8c12-a1200442daaa_IBD_DIAGRAM","parentId":"3b75a898-5dee-4729-95d7-26e1aa15021e_IBD_SUBSOLUTION","text":"USB-C Battery Charger","path":"/design/interactive-block-diagrams/consumer/usb-c-battery-charger","children":[{"id":"f7d009c3-2705-54a7-9778-1e1100c8bbb0_IBD_SUBDIAGRAM","parentId":"c96731ea-a25d-5f1d-8c12-a1200442daaa_IBD_DIAGRAM","text":"USB-C Battery Charger - DC Input","path":"/design/interactive-block-diagrams/consumer/usb-c-battery-charger/usb-c-battery-charger-dc-input","children":[]},{"id":"3322a8bf-88a3-5035-8d63-75b536560ed0_IBD_SUBDIAGRAM","parentId":"c96731ea-a25d-5f1d-8c12-a1200442daaa_IBD_DIAGRAM","text":"USB-C Battery Charger - AC Input","path":"/design/interactive-block-diagrams/consumer/usb-c-battery-charger/usb-c-battery-charger-ac-input","children":[]}]}]},{"id":"7acbfada-a191-4c6e-8f8c-a38ff2310622_IBD_SUBSOLUTION","parentId":"873eba36-5810-4201-b40f-49e775f3b450_IBD_SOLUTION","text":"Portable Cameras","path":null,"children":[]}]},{"id":"9d330931-7485-49dd-ae21-990ea4e17af9_IBD_SOLUTION","parentId":"916f3da5-3f52-4350-850d-bc9e19a1f792","text":"Medical","path":"/design/interactive-block-diagrams/medical","children":[{"id":"5c23e744-b034-4c49-8301-946605fe3ea3_IBD_SUBSOLUTION","parentId":"9d330931-7485-49dd-ae21-990ea4e17af9_IBD_SOLUTION","text":"Consumer Medical","path":null,"children":[{"id":"44b1b370-bc56-4315-b4c4-e3b92d63e14b_IBD_DIAGRAM","parentId":"5c23e744-b034-4c49-8301-946605fe3ea3_IBD_SUBSOLUTION","text":"Fitness and Activity Tracker","path":"/design/interactive-block-diagrams/medical/fitness-and-activity-tracker","children":[]},{"id":"ea7af679-13bd-4c2b-9af9-f744baee9916_IBD_DIAGRAM","parentId":"5c23e744-b034-4c49-8301-946605fe3ea3_IBD_SUBSOLUTION","text":"Pulse Oximeter","path":"/design/interactive-block-diagrams/medical/pulse-oximeter","children":[]}]},{"id":"232a1fe1-c60b-4a4f-853e-7b73a7209c91_IBD_SUBSOLUTION","parentId":"9d330931-7485-49dd-ae21-990ea4e17af9_IBD_SOLUTION","text":"Clinical Diagnostics & Therapy","path":null,"children":[{"id":"3b2605a6-92e0-47c7-9d00-36d0f68dfaad_IBD_DIAGRAM","parentId":"232a1fe1-c60b-4a4f-853e-7b73a7209c91_IBD_SUBSOLUTION","text":"Automated External Defibrillator","path":"/design/interactive-block-diagrams/medical/automated-external-defibrillator","children":[]},{"id":"8c3bfd5f-683a-40b7-a0ce-612b457dc394_IBD_DIAGRAM","parentId":"232a1fe1-c60b-4a4f-853e-7b73a7209c91_IBD_SUBSOLUTION","text":"Blood Pressure Monitor","path":"/design/interactive-block-diagrams/medical/blood-pressure-monitor","children":[]},{"id":"13f20f92-956a-5e5c-95c2-e76d6642b6b5_IBD_DIAGRAM","parentId":"232a1fe1-c60b-4a4f-853e-7b73a7209c91_IBD_SUBSOLUTION","text":"Continuous Glucose Monitor","path":"/design/interactive-block-diagrams/medical/continuous-glucose-monitor","children":[]},{"id":"f6130e35-4fd0-4719-acac-e3da45c1a9a6_IBD_DIAGRAM","parentId":"232a1fe1-c60b-4a4f-853e-7b73a7209c91_IBD_SUBSOLUTION","text":"Hearing Aid","path":"/design/interactive-block-diagrams/medical/hearing-aid","children":[]},{"id":"a3e4f792-c0dc-4153-bb76-59bbe623ed64_IBD_DIAGRAM","parentId":"232a1fe1-c60b-4a4f-853e-7b73a7209c91_IBD_SUBSOLUTION","text":"Patient Monitor","path":"/design/interactive-block-diagrams/medical/patient-monitor","children":[]},{"id":"fa0c8829-c8b8-426a-8624-fb6406550d0b_IBD_DIAGRAM","parentId":"232a1fe1-c60b-4a4f-853e-7b73a7209c91_IBD_SUBSOLUTION","text":"Ultrasound Transducer","path":"/design/interactive-block-diagrams/medical/ultrasound-transducer","children":[]}]},{"id":"d17e7410-a519-48f1-887a-1644e3a10c78_IBD_SUBSOLUTION","parentId":"9d330931-7485-49dd-ae21-990ea4e17af9_IBD_SOLUTION","text":"Medical Imaging","path":null,"children":[{"id":"7780a3f3-3fe2-4f1c-a8f4-f873ed853c45_IBD_DIAGRAM","parentId":"d17e7410-a519-48f1-887a-1644e3a10c78_IBD_SUBSOLUTION","text":"Digital Radiography","path":"/design/interactive-block-diagrams/medical/digital-radiography","children":[]}]}]}]